17 Jul Specify Your Minimum Viable Product (MVP) Feature Set
Jul 17, 2024
Once you have a clear understanding of your value proposition — meaning the products and services you will provide to the end customer that address a problem they have — the next step is to decide on the feature set for your minimum viable product (MVP).
You aren’t going to begin by building a complete version of your product, as that would take too long and be too risky. For your MVP, you want to identify the minimum functionality required to validate that you are headed in the right direction — in other words, that someone is willing to pay for your product or service.
Step 1: User Story
User stories are a fantastic way to formulate your feature ideas to ensure they align with what users want. A user story is a brief description of the benefit a particular functionality should provide, specifying who the benefit is for and why the customer wants that benefit.
You can use this template:
As a < description of the customer >,
I want to < perform some action >,
so that I can < achieve a desired benefit >.
Here’s an example of a user story that follows this template:
“As a person who regularly visits the local food store, I want to recycle my waste from home easily using the recycling machines provided by the food store, so that I can earn points to use as a discount on goods I buy.”
To make your story stand out, use the following tips:
- Independent: Your stories must be independent of each other and should not overlap.
- Valuable: A good story needs to provide value to the customer.
- Estimable: A good story can be easily estimated in terms of how much time is required for delivery.
- Small: If your story is too long, you should break it down into smaller stories.
- Testable: A good story makes it clear how to test and confirm that the story is “done”.
For each feature or set of features, you’d like to provide, write a story.
Step 2: Breaking Features Down
Once you have written your high-level user stories for your top features, the next step is to identify ways to break each of them down into smaller pieces of functionality.
For instance, if you have the functionality to share a blog post to different social networks on your website, breaking down that feature means dividing the share functionality into subtasks for each separate social network.
Step 3: Scoping With Story Points
Readers with experience in working with Agile methodology will know that each sub-feature is discussed with the team with the ultimate goal of estimating the amount of effort required to develop each sub-feature.
For example, every small task may be allocated 1 point, while a medium task may take 3 points and larger ones 8 points.
There is also a rule that if a task takes more than X points, it must be broken down into smaller tasks.
Step 4: Created Value
So far, we’ve broken down our features into small chunks, prioritising them based on the efforts required to develop them. However, we haven’t yet taken into account the value we provide to the customer.
Take the complete list of features (and sub-features) and brainstorm with your team to identify what value each sub-feature provides to the customer. You are aware that this evaluation is subjective. Value for the customer could be measured by “how much money you save the customer when you offer an insurance service” or “how happy and satisfied they would feel when you provide a travel service”.
As you can see, the value each of your ideas or features provides depends on the nature of your business.
After completing this task, you will end up having a list of features or ideas evaluated via story points (indicating the effort required to develop that idea) and points corresponding to the value that feature will bring to the customer.
Step 5: Created Value vs. Invested Efforts
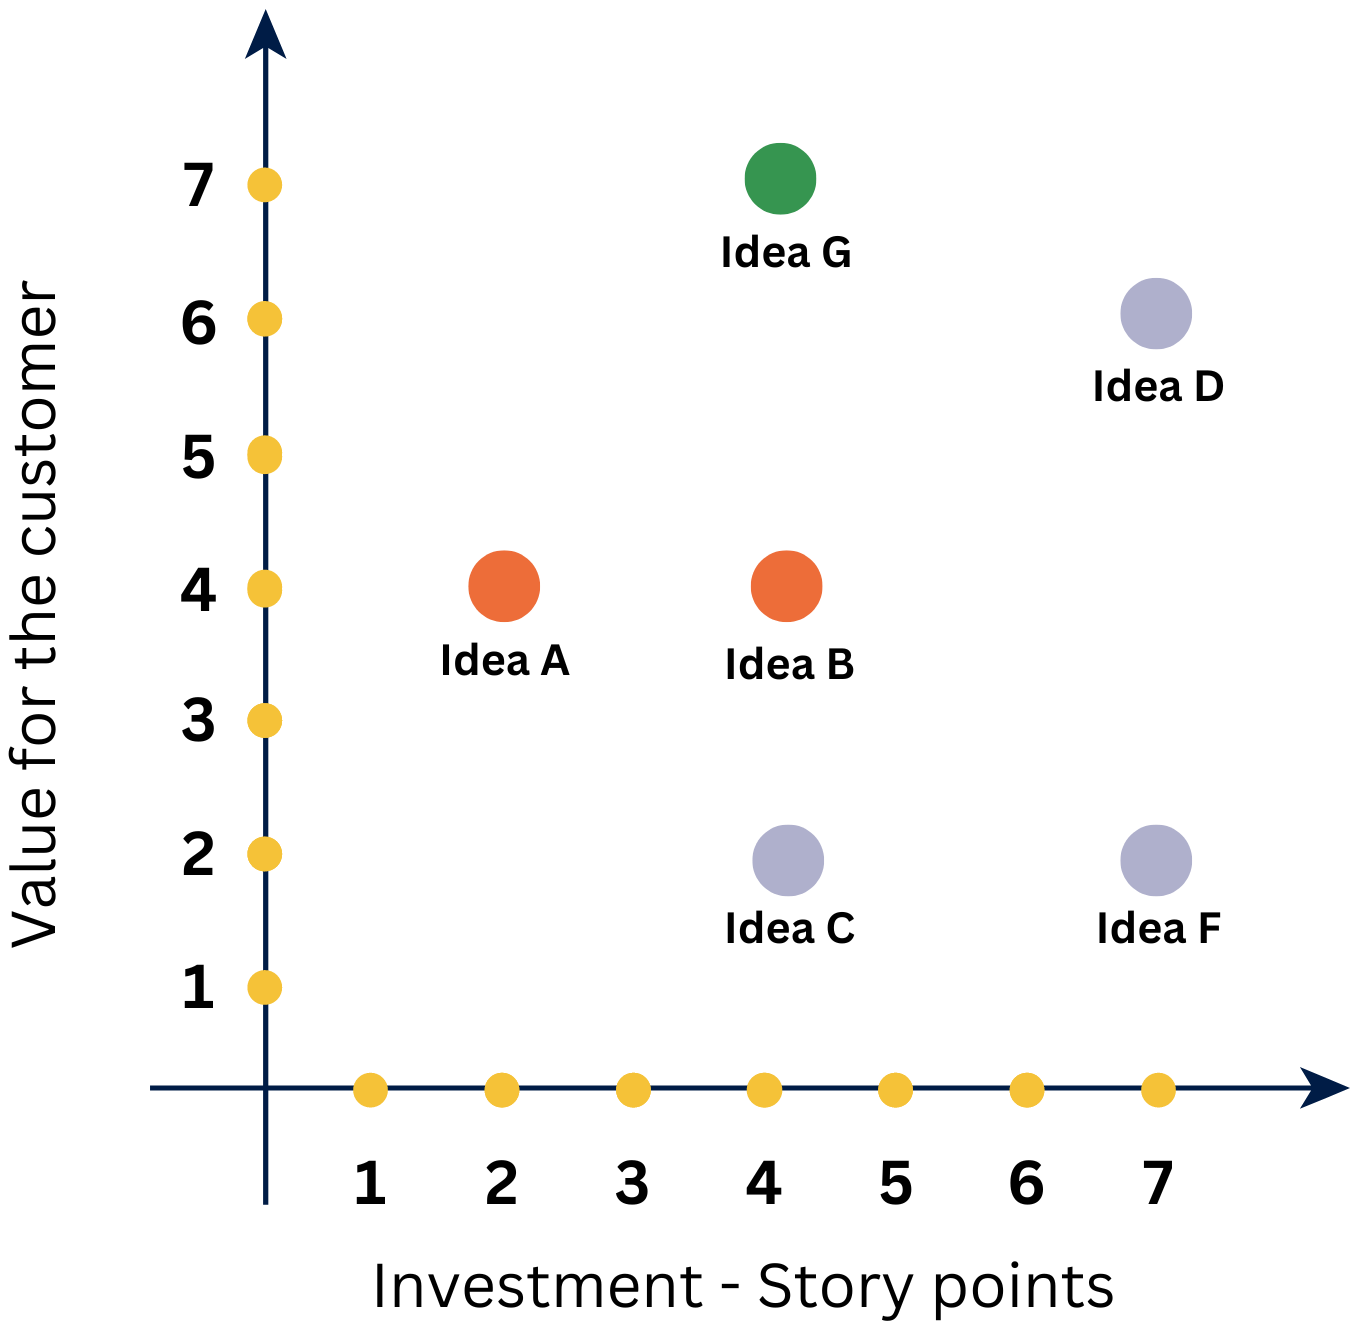
The next step is to take an XY coordinate system. The X-axis represents the story points and the Y-axis represents the value for the customer. Plot each feature/idea.

We can recognise four groups of features:
- Ideas A and B are valuable because they provide value to the customer and do not require much effort to be developed.
- Idea D provides high value; however, it requires significant effort. It is advisable to develop this idea later.
- Ideas C and F, on the other hand, do not provide much value and also require significant effort.
- Idea G is the winner because it provides high value and does not require much effort to be developed.
With that said, we can prioritise our ideas in the following order:
- G
- A and B
- D
- C and F
Step 6: Deciding on Your MVP Candidates
The last step is to organise the features into two groups: “Must-Have” and “Distinguisher”.
“Must-Have” stands for features representing the core of your product. For instance, if I create a bakery, baking bread with yeast is a must-have.
“Distinguisher” is a feature that will set you apart from the competition. By providing features from this group, the customer will be able to recognise you as different compared to the competition. Let’s say I have an online shoe store. A differentiating feature could be delivering free shoe paint with each pair of shoes purchased.
Once you categorise the features into these two groups, we can use the prioritisation we did in the previous chapters to prioritise the features over time.
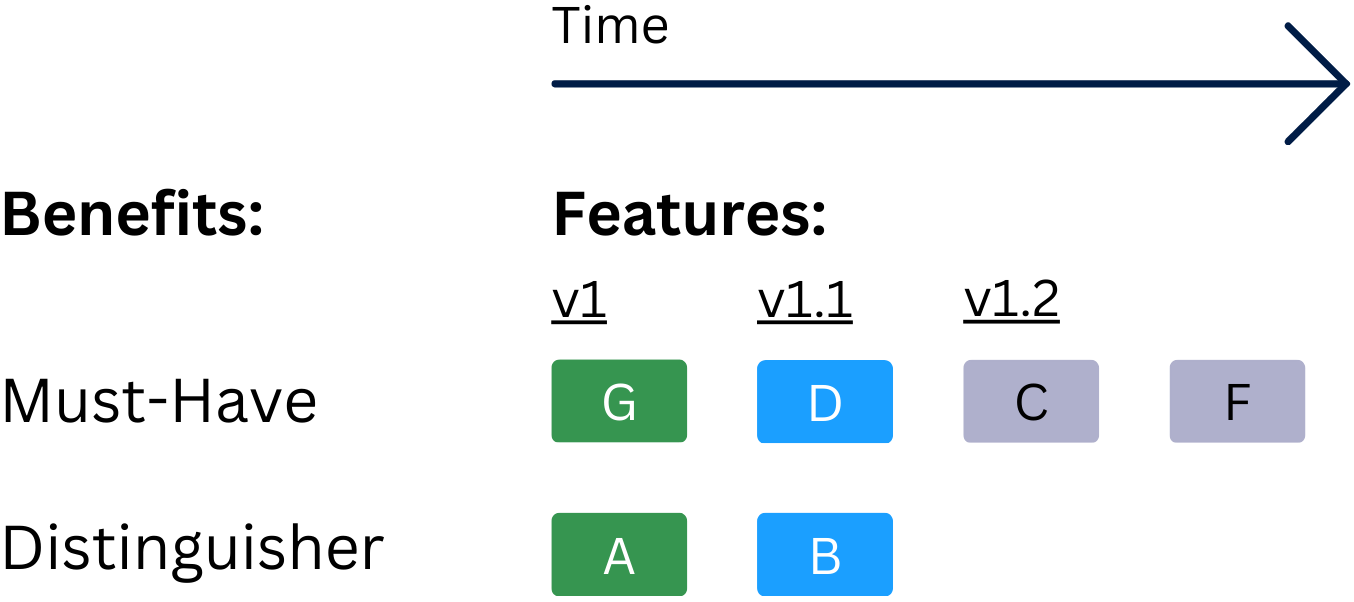
To get a visual idea of what I’m talking about, have a look at the graph below.

We have a vertical categorisation based on the two categories, “Must-Have” and “Distinguisher”. We also have a horizontal categorisation based on the value we provide to the customer and the ease of providing each specific feature.
By categorising the features following this methodology, the versions of our MVP become obvious. We have three versions: 1, 1.1 and 1.2.
For the preparation of this graph, we need to adhere to two rules:
- Each version should not contain too many features, because we aim to develop it rapidly, enabling us to release it soon, test it, and verify our hypothesis — that the customer is willing to pay for what we offer. You can read more about why we need multiple sub-versions of our MVP in one of my previous posts, ‘How To Build a SaaS From Scratch’, specifically the chapter titled ‘Step 7: Iterate’.
- We should not divide the features into more than three MVP versions. This is because after validating our hypothesis with the first two or three versions, the features we may need to provide in all subsequent versions may differ from our initial expectations.
