
30 Jan How to create and deploy ERC-20 token on Polygon and Ethereum Mainnet
Jan 30, 2022 – 26 min read
Content
- Intro
- Tools
- Preparation
- ERC-20 standard
- Example Smart Contract
- Smart Contract
- Tests
- Migration
- Deployment On The Polygon Testnet
- Deployment On The Polygon Mainnet
- Deployment On The Ethereum Testnet
- Deployment On The Ethereum Mainnet
- How To Transfer ERC-20 Token From Polygon Mainnet To Ethereum Mainnet?
- Bonus Chapter: How To List My ERC-20 Token On UniSwap?
- The Easy Way
- Final Thoughts
Intro
In this tutorial we’ll create our own ERC-20 token and deploy it on the Polygon and Ethereum networks. You are required to have basic understanding of Solidity and Blockchain.
Before we start let’s clarify a few terms.
What is Ethereum?
Ethereum is a decentralized, open-source blockchain with smart contract functionality.
What are smart contracts?
Smart contracts contain code written in Solidity language and compiled into an ABI code that is deployed and executed in the Ethereum blockchain.
Think of the smart contracts as executable code that can represent applications performing certain actions or processing transactions of assets between two or more parties.
What is a transaction?
An Ethereum/Polygon transaction refers to:
- an action initiated by an externally-owned account, in other words an account managed by a human, not a smart contract. For example, if Bob sends Alice 1 ETH, Bob’s account must be debited and Alice’s must be credited. This state-changing action takes place within a transaction.
- an action initiated by a smart contract. In this case the transaction will execute the contract code. When deploying our ERC-20 token on the blockchain network we refer to that as a transaction.
What is ERC-20 token?
ERC-20, a standard proposed by Fabian Vogelsteller, is a smart contract that contains a set of APIs. ERC-20 defines a set of rules that apply to all tokens that choose the ERC-20 standard.
Also, here is a definition by Investopedia:
ERC-20 is similar, in some respects, to bitcoin, Litecoin, and any other cryptocurrency; ERC-20 tokens are blockchain-based assets that have value and can be sent and received. The primary difference is that instead of running on their own blockchain, ERC-20 tokens are issued on the Ethereum network.
A few examples of ERC-20 tokens are – Tether (USDT), 0x (ZRX), Chainlink (LINK). (Note: This list is only for the sake of the example and it’s not a financial advice in any way.)
What is Polygon network and why do we deploy our ERC-20 token on it?
Polygon, formerly known as the Matic Network, is a Layer-2 scaling solution that aims to provide multiple tools to improve the speed and reduce the cost and complexities of transactions on Ethereum blockchain network. If you want to read more about Polygon and how it works you can check their official documentation – Polygon documentation.
The short answer to why we want to deploy our ERC-20 token on Polygon is because – currently on January 30th, 2022- we’ll pay lower fees compared to if we deploy it on the Ethereum network. The last statement will change after the release of ETH 2.0.
Tools
In this tutorial we’ll use the following tools:
- VSCode – code editor
- NodeJS
- Truffle
- MataMask
VSCode
VSCode is a great code editor and I strongly recommend it because it has a big community of developers and plenty of extensions. If you don’t have it installed on you machine, you can download it from download VSCode.
Once you’re ready with the installation, I recommend installing Solidity syntax highlighter extension that will help us when wring our ERC-20 token.
NodeJS
We need NodeJS to executes JavaScript code outside a web browser which in our case is used to run unit tests and migrate (deploy) our smart contract on the blockchain network.
You can download NodeJS from their official website or you can install it via the package manager of your choice. In my case I use Homebrew.
Note: You can download and install Homebrew package manager from here – brew.sh.
Truffle
Truffle is a world-class development environment, testing framework and asset pipeline for blockchains using the Ethereum Virtual Machine (EVM), aiming to make life as a developer easier. Truffle is widely considered the most popular tool for blockchain application development with over 1.5 million lifetime downloads.
To install it open your Terminal and run the following command.
Consider reading the installation instructions published on the official website of Truffle because depending on your environment (operating system) you may face issues during the installation if you don’t take into account their recommendations.
MetaMask
MetaMask is a software cryptocurrency wallet used to interact with the Ethereum blockchain. It allows users to access their Ethereum wallet and ERC-20 tokens through a browser extension or mobile app. Use the following link to download and install it – metamask.io. Check the official instructions on their website – how to set up MetaMask.
Preparation
Open the Terminal and create a directory where we will write the code of our ERC-20 token.
Next, inside token folder initialise a new project that contains the folder structure and the files we need for the development of the smart contract.
Open the folder with VSCode. Here is a quick command to open the code editor:
The folder structure of the project should look like this.
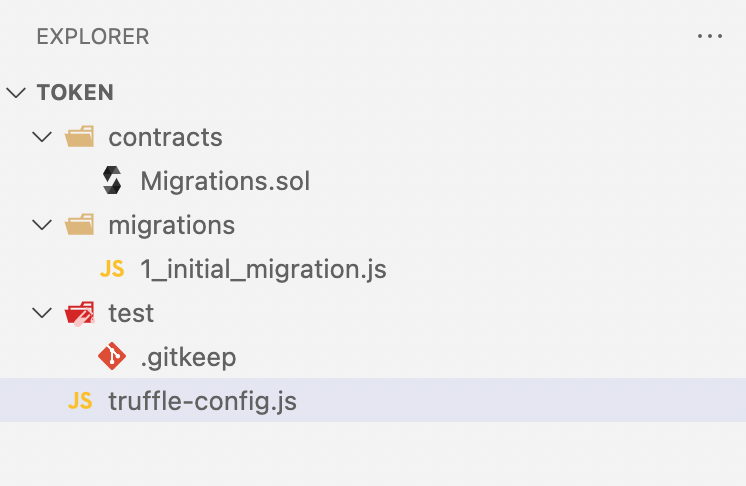
Explanation:
- contracts/ – this is the folder containing the smart contract of our ERC-20 token
- migrations/ – this folder contains code that deploys our contracts on the blockchain network
- test/ – this folder contains all unit tests that test our smart contract
- truffle-config.js – this file contains configurations important for the work of Truffle and the deployment of the ERC-20 token
As the work on our project progresses, the main directory will contain the following additional folders:
- build/ – contains the compiled smart contract ready for deployment
- node_modules/ – contains packages required for the development of the smart contract
Let’s focus first on how to write our smart contract and later we’ll go through the tests and the migrations.
ERC-20 standard
As we mentioned above ECR-20 is a standard. A smart contract applying the interface of this standard is called ERC-20 token – specification of ERC-20 interface. Before starting with the development we have to understand the interface and therefore the requirements to the smart contract.
In practice, an ERC-20 would look something like this in Solidity:
[code language=”js”]
function name() public view returns (string)
function symbol() public view returns (string)
function decimals() public view returns (uint8)
function totalSupply() public view returns (uint256)
function balanceOf(address _owner) public view returns (uint256 balance)
function transfer(address _to, uint256 _value) public returns (bool success)
function transferFrom(address _from, address _to, uint256 _value) public returns (bool success)
function approve(address _spender, uint256 _value) public returns (bool success)
function allowance(address _owner, address _spender) public view returns
[/code]
Let’s go through it (Note: Understanding the standard is fundamental for understanding the rest of the tutorial).
- name returns the name of the token (e.g., Gold)
- symbol returns the symbol of the token (e.g., GLD)
- decimal returns the number of decimals the token uses – e.g. 8, means to divide the token amount by eight million to get its user representation. For instance, let’s say our token is called EUR and the smallest unit is called euro cent. If 100 euro cents is equal to 1 EUR that means that the decimal is 2.
- totalSupply returns the total number of units (e.g., 1 000 000 EUR).
- balanceOf returns the balance of an account. Think of the account as a bank account where the IBAN is called address (we will use that term later). Each user using our ERC-20 token can have one or more accounts.
- transfer allows us to transfer a certain amount from our account to another account.
- approve. To understand that one, I will give an example. Let’s say we visit an online store. We want to buy a phone which unfortunately is not in stock. The store offers us to allow them to spend a certain amount from our account when the phone is in stock. We agree. By agreeing we approve a future transaction where the online store (spender) is allowed to spend up to a certain amount from our account (owner).
- allowance returns the amount the spender is approved to withdraw from the owner’s account. In continuation of the example above let’s say the phone we’d like buy costs 20 GLD. We already approved the future transaction which states that the spender is allowed to spend up to 20 GLD from our account. This amount is called allowance.
- transferFrom performs the transaction approved by the owner. In other words, the spender who has been approved sends the allowance to the account of the recipient – the seller of the phone.
Events can also be registered on our smart contract to capture certain events when they are emitted. The contract uses these events to communicate to dApps (decentralised applications) and other smart contracts. ERC-20 tokens have the following events:
- Transfer which must be triggered when tokens are transferred.
- Approval which must be triggered when an account (spender) is approved to spend a certain amount of tokens.
Before I show an example code I’d like to mention two additional terms.
- Mint is the process of adding more units to the total supply of the token. In the case when the units of the token have monetary value, this action is equal to “printing money” because it leads to devaluation.
- Burn is the process of removing units from the total supply of the token.
Example smart contract
Open the following example published by the Ethereum community on GitHub – Example ERC-20 token. Read this chapter and don’t copy the example code in VSCode. We will start writing code in the next chapter.
Let’s break down the code step by step.
On the first line we specify the accepted Solidity version of our smart contract.
Similar to defining a class the smart contract is defined by using the keyword contract followed by a name.
The first four parameters are used to store the name, the symbol, the decimals and the total supply of the token. The variable of type uint means unsigned integer – an integer that is zero or greater than zero.
Here we create two mappings – balanceOf where we store a key-value list of all accounts (addresses) and their balances; allowance where we store a key-value list of all allowances.
Here we generate three events which we use to notify the client(s) regarding the occurrence of certain events. These events will be triggered when we emit them – we will come back to this shortly.
The constructor of the smart contract is called when we migrate (deploy) it on the blockchain network. It sets the name, the symbol, the total supply and also it gives the creator of the ERC-20 token all initial tokens equal to the total supply.
This method calls the internal method _transfer with the following parameters:
- msg.sender – this variable is equal to the address of the account who is calling this method. In this particular case this is the person who’d like to send units to another account.
- _to – the address of the account who will receive units of the token.
- _value – amount the sender is willing to send.
The first three lines use require() that checks if certain conditions are fulfilled. If they are not, the method fires an error and the execution of the code is terminated. In this particular case this method requires the following:
- Is the sender trying to send units to a ZERO ADDRESS? The zero address is equal to 0x0 and it does not correspond to a real account.
- Is the balance of the sender equal or greater than the amount he is willing to send?
- After receiving the units, the amount of recipient’s account should be greater than the amount before the execution of the transaction.
In the next few lines we deduct the amount from the sender’s account and add it to the recipient’s account. The final step is to emit Transfer event.
In this method the owner of the account (msg.sender) approves the spender to spend up to _value units of the ERC-20 token. The last step is to emit Approval event.
The first line of code checks if the amount of units the spender wants to spend are less or equal to the allowance. If yes, we deduct the amount from the allowance and perform the transaction.
This method is responsible for burning units of the ERC-20 token. On the first line we check if the balance of the sender is greater than or equal to the amount he is willing to burn. If yes, we deduct the amount from the balance of the sender and the total supply. The last step is to emit Burn event.
This method is similar to method transferFrom. The owner has approved the spender to spend tokens from the account of the owner which the spender burns.
All of this may look a little bit confusing in the beginning but if you go through the code and the ERC-20 standard once again you will realise its simplicity.
Let’s move ahead.
Smart contract
There is something I’d like to share with you. Probably part of you will get angry because I want to tell you that we don’t need the code we have just reviewed. We can throw it in the bin. Another part of you probably will feel happy because the code of the ERC-20 token we’ll write is about 14 lines of code.
Then why did we go through all of this? The answer is simple. We have to understand the details, how the ERC-20 smart contracts work before simplifying. Simplifying before understanding the essence is not beneficial in any way.
We’ll use the library OpenZeppelin Contracts. This is a library for secure smart contract development built on a solid foundation of community-vetted code.
To install the library, open the Terminal and inside token folder run the following command.
Open VSCode and inside folder contracts create a new file Token.sol. This is the file where we’ll put the code of our smart contract.
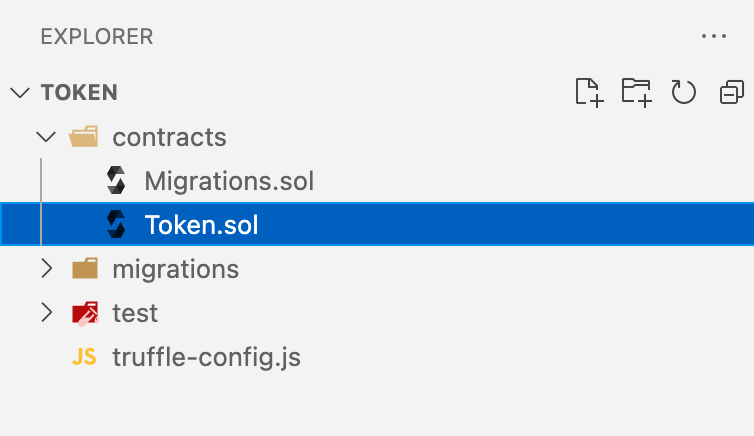
Copy the code below inside the file and save it.
This is our smart contract. On line 1 we tell Truffle that we’ll use Solidity version between 0.7.0 and 0.9.0. On line 4 we import ERC20.sol which is ERC-20 smart contract already developed and tested by OpenZeppelin. ERC20 applies the ERC20 standard and it contains all methods we already reviewed. If you are curious, you can check the code of the contract.
On lines 6 to 14:
- create our own smart contract that inherits ERC20;
- call the constructor of ERC20 and pass the name, the symbol and the total supply;
- mint the total supply to the account of the creator.
Here I’d like to mention that the name and the symbol of our token is going to be Gold, GLD.
Tests
As a big fan of TDD (Test-Driven-Development) I’d start writing tests first before writing a single line of code. The reason I allowed myself to create the smart contract first is because ERC20 written by OpenZeppelin has been tested. You can check the tests on GitHub.
But still there is something which we can test – the migration of our smart contract which is not written yet.
Open VSCode and in folder test create a new file Token.test.js.
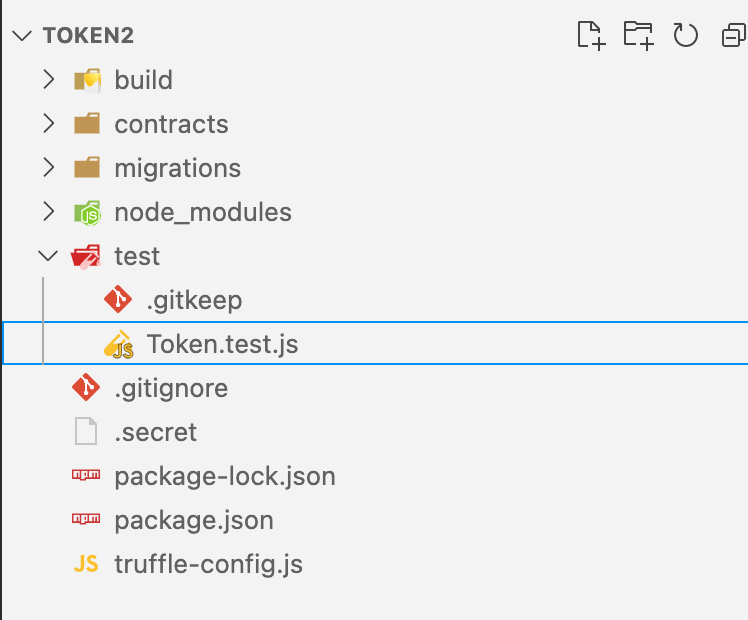
For the tests we’ll use the library OpenZeppelin Test Helpers. Open the Terminal and inside folder token run the following command:
Once the installation is completed copy the code below in Token.test.js file.
On lines 2 to 4:
- import BN from OpenZeppelin Test Helpers, we use it to define variables of type Big Number;
- import expect from Chai;
- create an instance of the ERC-20 smart contract.
Next, we define the name, the symbol, the total supply and the decimals of our ERC-20 token. Later we’ll test if our token matches these values.
This code initialise an instance of the token before the start of the tests.
The tests are numerated and they test the following:
- Does method totalSupply() return the total supply stored in TOTAL_SUPPLY?
- Does the name of the ERC-20 token match the value of NAME?
- Does the symbol of the ERC-20 token match the value of SYMBOL?
- Does the decimals of the ERC-20 token match the value of DECIMALS?
- Is the initial total supply assigned to the creator of the token?
Note: The last test tests if we assign the initial total supply to the creator of the token which is an action performed inside Token.sol which we created before writing the tests. This breaks the TDD principles, but for that particular case we’ll “close our eyes” and continue.
Inside the main folder of the project run the following command.
The tests will fail because we didn’t write the migration of the smart contract. So far so good. Let’s write the migration.
Migration
Migrations are JavaScript files that help you deploy contracts to the blockchain network. Open folder migrations in VSCode and create a new file 2_deploy_contracts.js.
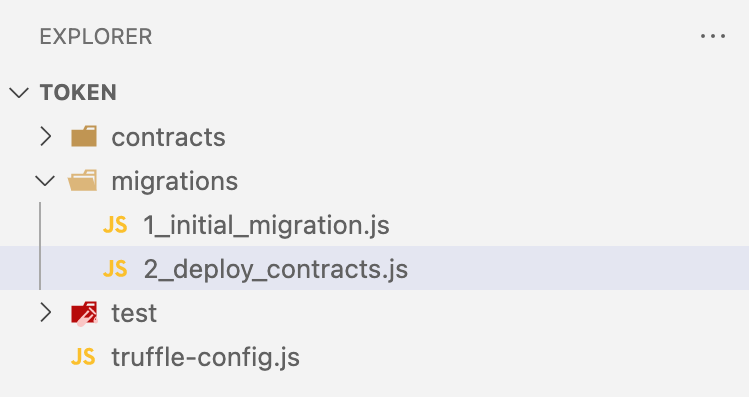
The name of the migration starts with 2 is because the number tells Truffle the execution order of the migrations. Copy paste the following code inside the file.
On the first line we instantiate the smart contract. On the next few lines we deploy it by passing the name, the symbol and the total supply. Save the file and run the tests.
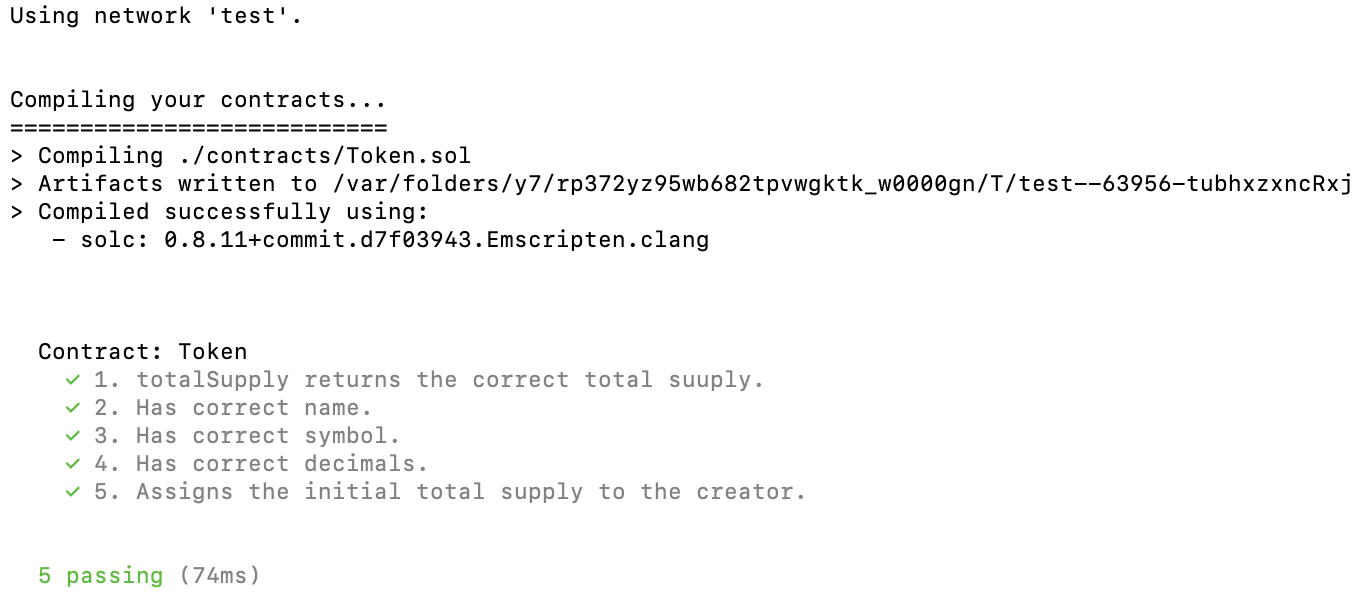
Voilà! The tests pass. The smart contract, the migration of the smart contract and the tests are ready.
Deployment on the Polygon Testnet
Why do we deploy on the test network?
Deploying on the main network of Polygon and Ethereum costs real money. We certainly want to test the deployment process and the work of our ERC-20 token before paying from our pocket.
Why do we need MetaMask?
We will use the address of our MetaMask wallet – representing an account – to sign the transaction of the deployment of our ERC-20 token on the blockchain network. Also, that account is going to be the owner of the initial token supply. Therefore we have to connect our MetaMask to the corresponding blockchain network in order to be able to sign transactions.
Also, because writing on the blockchain requires us paying fees, we have to top up our wallet with MATIC – the token of Polygon – in order to pay for the migration/deployment of our ERC-20 token. In the next two chapters we will connect MetaMask to the required blockchain network and we’ll top up the account with tokens.
Add Polygon Testnet (Mumbai) to MetaMask
Open MetaMask and follow the steps:
- Click on the list of networks located at the very top.
- Choose “Add Network”.
- Open Add Polygon Network, scroll to the very bottom of the page and add the configurations of the Polygon Mumbai Test Network to your MetaMask. Your screen should look like this.
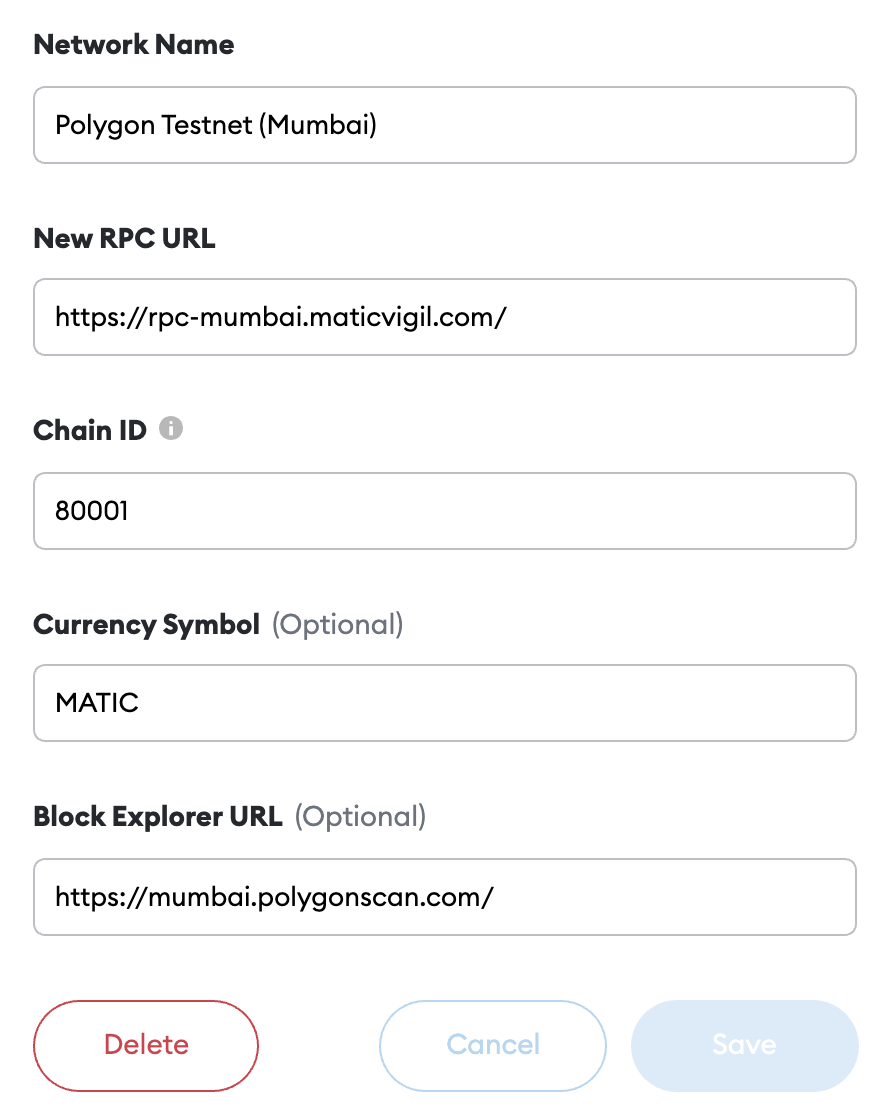
- Save and close.
- Go back to MetaMask and from the list of networks choose Polygon Test Network (Mumbai).
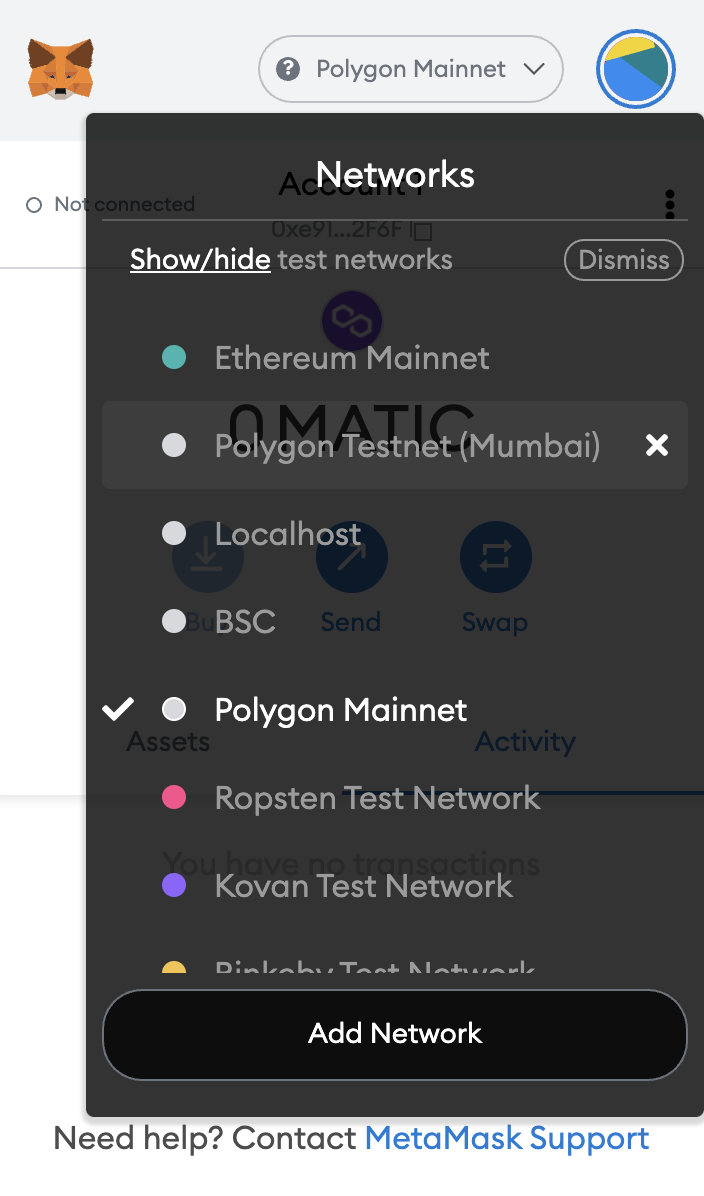
Top up your MetaMask account with MATIC
The MATIC token is used to pay transaction fees on the Polygon blockchain network. The Polygon Test Network (Mumbai) gives free MATIC tokens which we can use for test purposes. Steps:
- Open the following link – Polygon Faucet.
- Choose Mumbai and MATIC token.
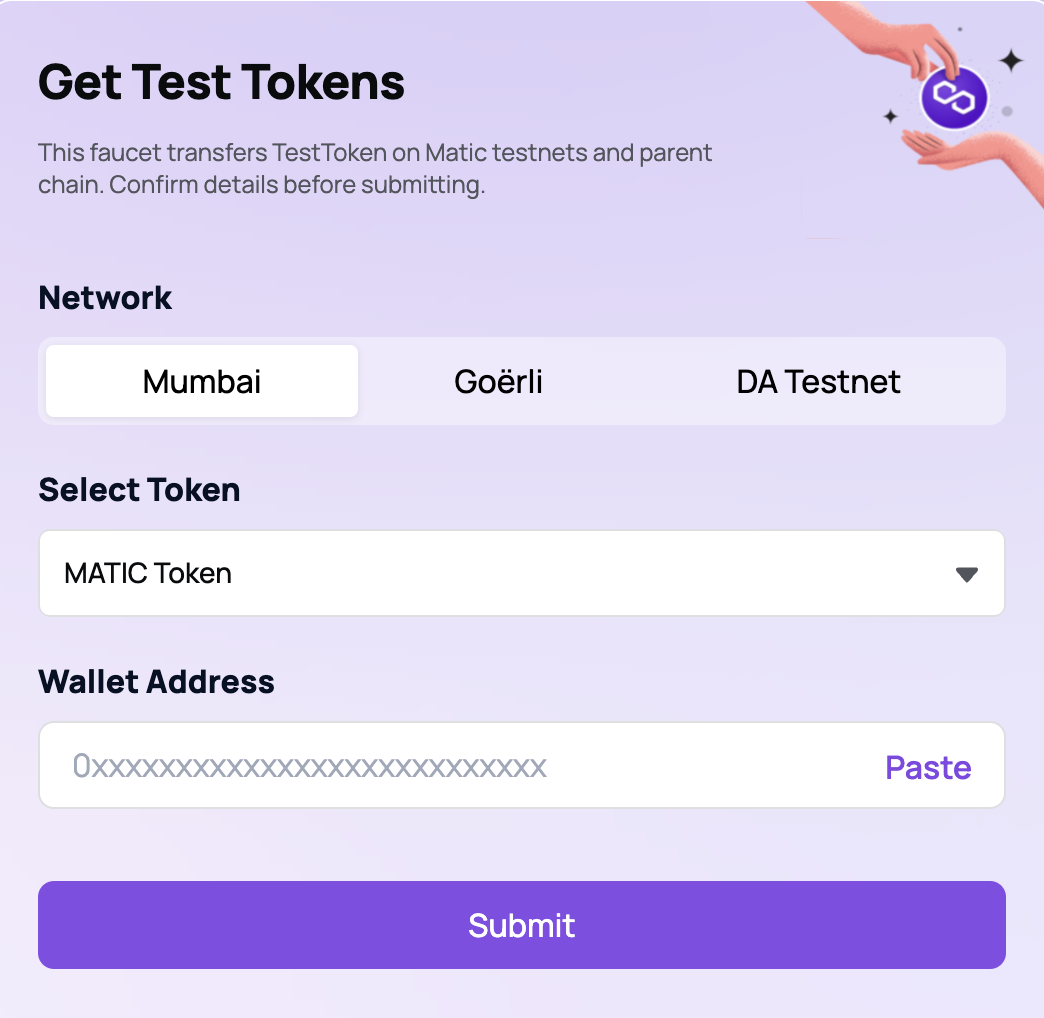
- Open MetaMask – be sure that you’ve switched to Polygon Mumbai Test Network – and copy the address of your wallet and paste it in the field “Wallet Address”.
- Press Submit. The MATIC test tokens should arrive in your wallet in a few seconds.
What is mnemonic?
A (typically) 12 or 24 word phrase that allows you to access your account which in our case is MetaMask. Imagine that tomorrow your machine gets broken and you can’t access your MetaMask wallet. If you have the mnemonic you can easily restore the wallet and access the balance of all assets. Also, think of the mnemonic as a sequence of keywords giving rights to execute transactions on behalf of your account (e.g., deployment of a smart contract).
What is HD Wallet Provider?
HD Wallet Provider can sign transactions for an address derived from a 12 or 24 word mnemonic. Think of the provider as a third-party service that can execute transactions on your behalf. In our case we need a provider to migrate/deploy our ERC-20 token on the blockchain network.
HD Wallet Provider
In this tutorial for the deployment on the Polygon network we’ll use Alchemy.
- Open Alchemy and sign up.
- Go to the Dashboard and click CREATE APP (top right corner).
- Give your app a name, set up the environment to Development, the chain to Polygon and the network to Polygon Mumbai.
- Create the app and go back to the dashboard. Click on the newly created app. Your screen should look like this.

- Click VIEW KEY (top right corner) and copy HTTP url. We’ll use that url to connect the provider with our mnemonic giving them rights to sign transactions and deploy our ERC-20 token.
Configure Truffle
Truffle needs to be configured in order to connect HD Wallet Provider. For the connection we need the HTTP url – which we already have – and the mnemonic of our MetaMask wallet. Open the Terminal and install the following package that will support the connection between Truffle and the provider.
Open truffle-config.js file in VSCode and at the very top of the file add the following lines of code.
Here we create an instance of HDWalletProvide package.
Here we instruct Truffle to take the mnemonic of our wallet from a file called .secret. IMPORTANT: Be sure that you include .secret in .gitignore file if you plan to publish the code on a public code repository. You want to avoid giving access to your wallet to strangers!
Scroll down and in section networks add the following code.
On line 1 we tell Truffle that the keyword matic corresponds to a connection to our HDWalletProvider. On line 2 we establish the connection via the HTTP url provided by the provider and the mnemonic of our MetaMask wallet. Note: Replace HTTP_URL with the url we already copied from Alchemy.
The meaning of the rest of the parameters is the following:
- network_id – Provided by the blockchain network (e.g., Polygon = 80001).
- gas – Gas limit used for deploys. Default is 6721975.
- confirmations – Number of confirmations to wait between deployments (default: 0).
- timeoutBlocks – If a transaction is not mined, keep waiting for this number of blocks (default is 50).
- skipDryRun – True if you don’t want to test run the migration locally before the actual migration (default is false).
Save the file.
Get the mnemonic from MetaMask
Open your MetaMask and click the profile icon located at the top right corner. Choose Settings -> Security & Privacy. Click “Reveal Secret Recovery Phrase”.
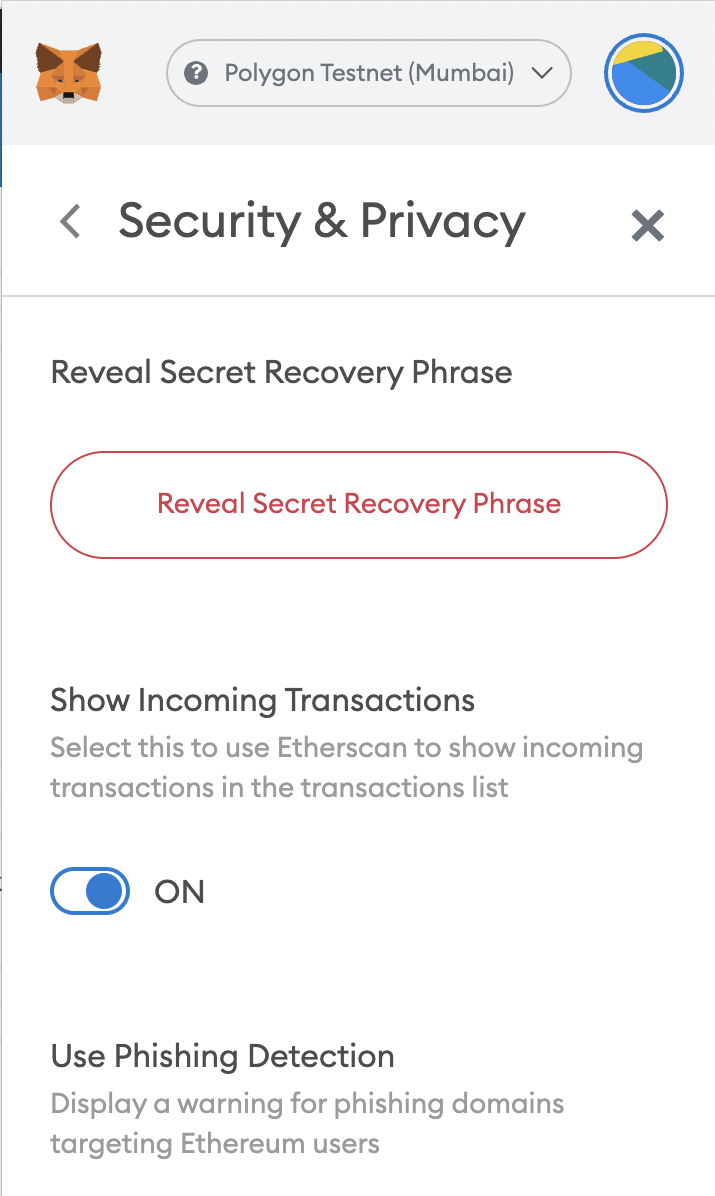
Enter your MetaMask password and copy the mnemonic of your wallet.
Add the mnemonic to Truffle
Open the main folder of the project in VScode and create a new file with the following name .secret. Paste your mnemonic inside, save and close.
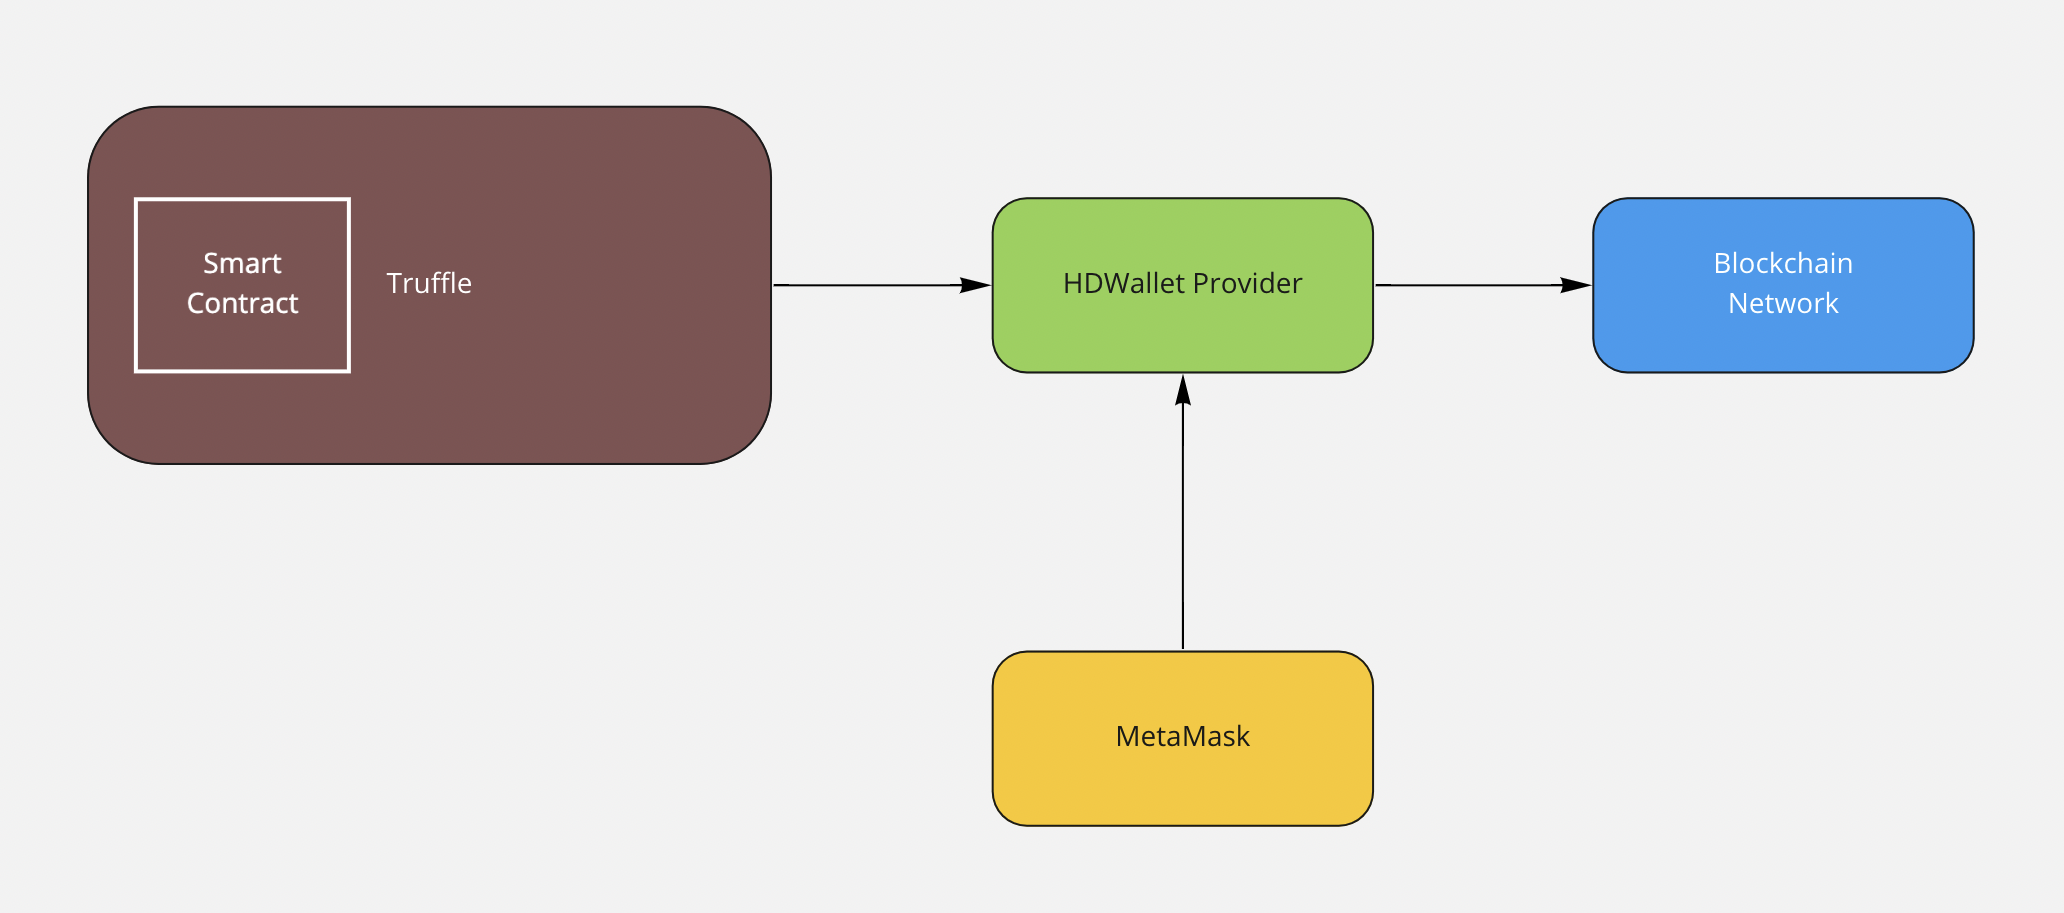
A diagram representing the migration/deployment
Here is a graphical representation of the migration process. HDWallet provider deploys our smart contract on behalf of our MetaMask on the blockchain network.
Final preparation before deployment
In case you’ve compiled a smart contract before reading this tutorial, in the main folder of the project you should have a folder named build. This folder contains the compiled ERC-20 token ready for migration/deployment. Delete it. We are going to recreate it with the next compilation. Run the command below.
Deployment
Run the following command in the Terminal.
This command tells Truffle to migrate our ERC-20 token on the Polygon Test Network (Mumbai) using the keyword matic which – as you remember – we defined inside truffle-config.js file.
To check if the ERC-20 token has been deployed successfully, open Mumbai Polygon scan network. Copy-paste the address of your MetaMask in the search field and press Enter. You should see a list of transactions that have been signed by your account. Click on the one that says “Contract Creation”.
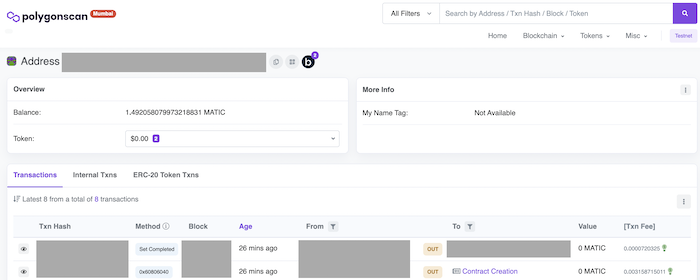
Congratulations! We deployed our ERC-20 token on the Polygon Mumbai test network.
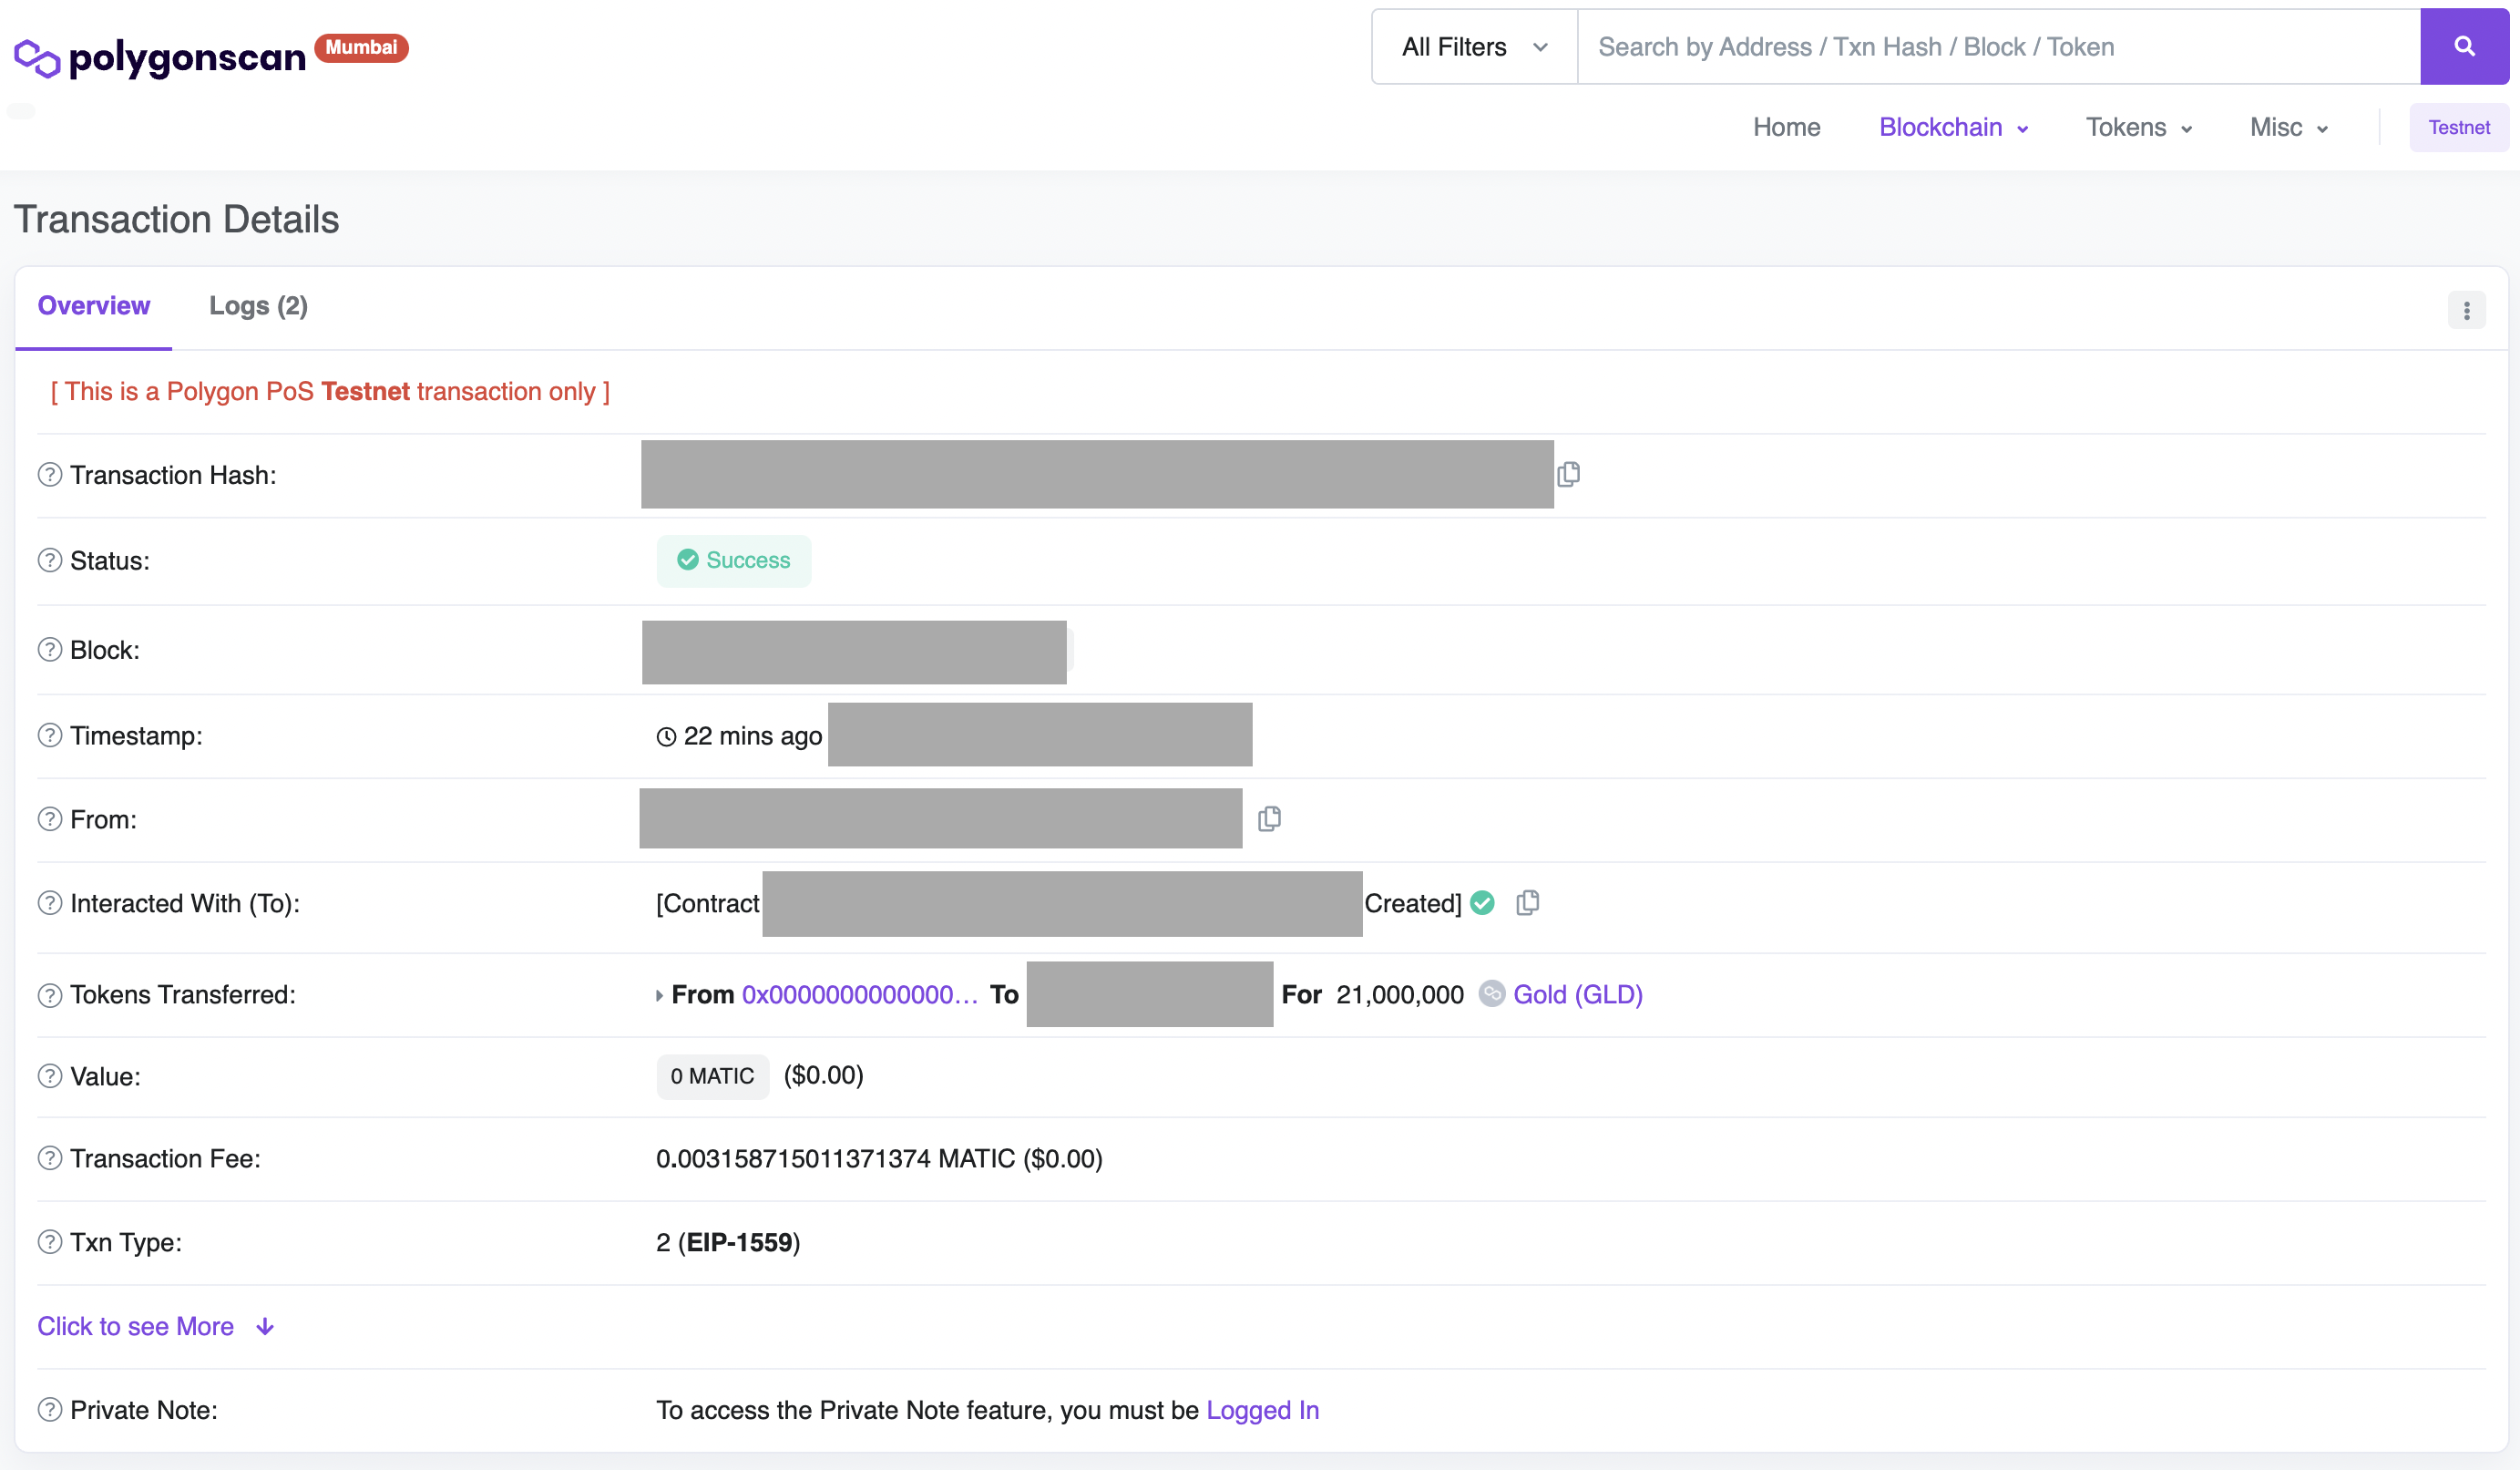
Note that the token has its own contract address. This address uniquely identifies the token and we need it to list it on exchanges and transfer the tokens to our wallet. Copy it. We’ll need it.
Possible errors
If you use NodeJS version 17 or later you may encounter the following error when trying to migrate the ERC-20 token.
According to the following issues reported on GitHub the solution is the following.
The OpenSSL legacy provider supplies OpenSSL implementations of algorithms that have been deemed legacy. Such algorithms have commonly fallen out of use, have been deemed insecure by the cryptography community, or something similar. We can consider this the retirement home of cryptographic algorithms.
Add ERC-20 token to your MetaMask wallet
Steps:
- Open MetaMask and switch to Polygon Test Network (Mumbai).
- Scroll down and click “Import tokens”.

- Paste the contract address in the field “Token Contract Address” – we got the contract address from Mumbai Polygon scan network.
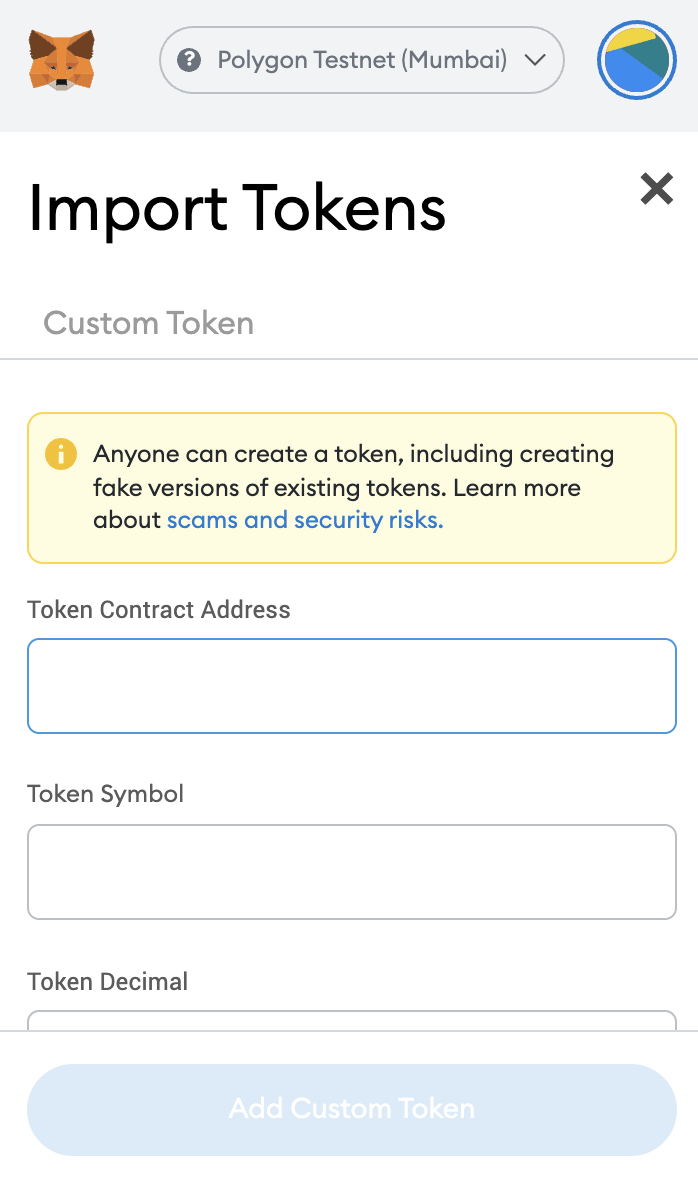
- Press “Add Custom Token”.
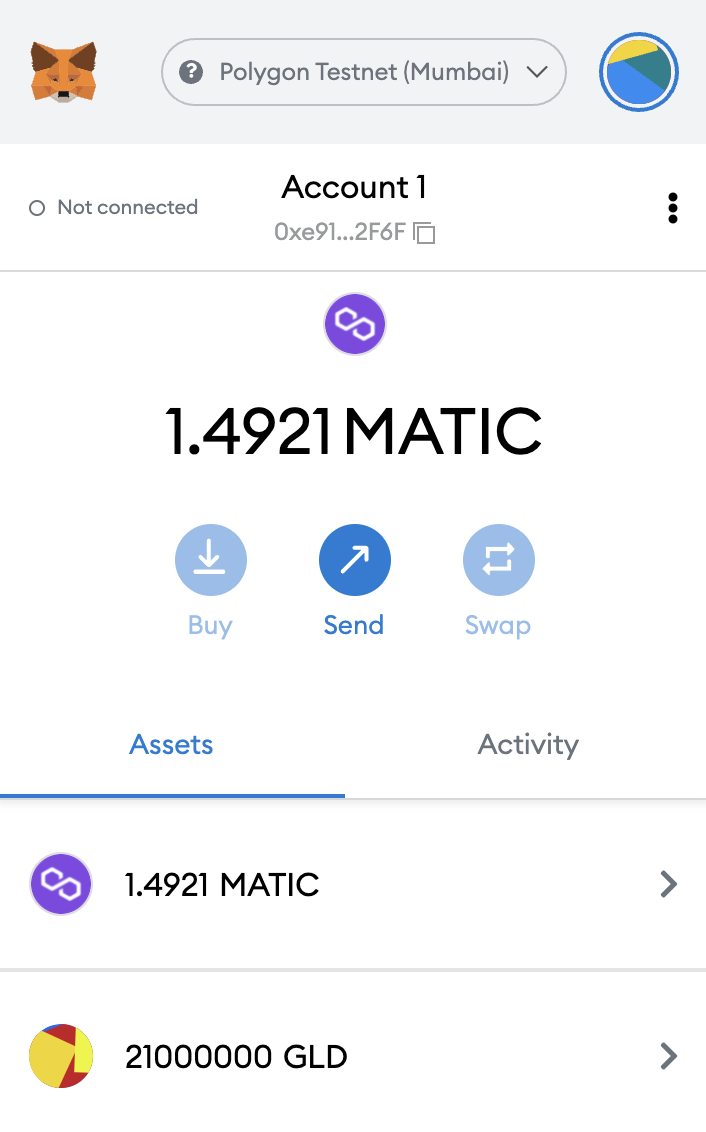
Your ERC-20 token is created and available in your wallet. Now you can spend it.
Deployment on the Polygon Mainnet
I presume that you didn’t jump directly to this chapter and you already followed the steps from the previous one – that means that most of the required configurations are already in place.
Add Polygon Mainnet To MetaMask
Similar to adding the Polygon Test Network (Mumbai) you have to add the Polygon Mainnet to your MetaMask. Open the Polygon documentation and add the network.
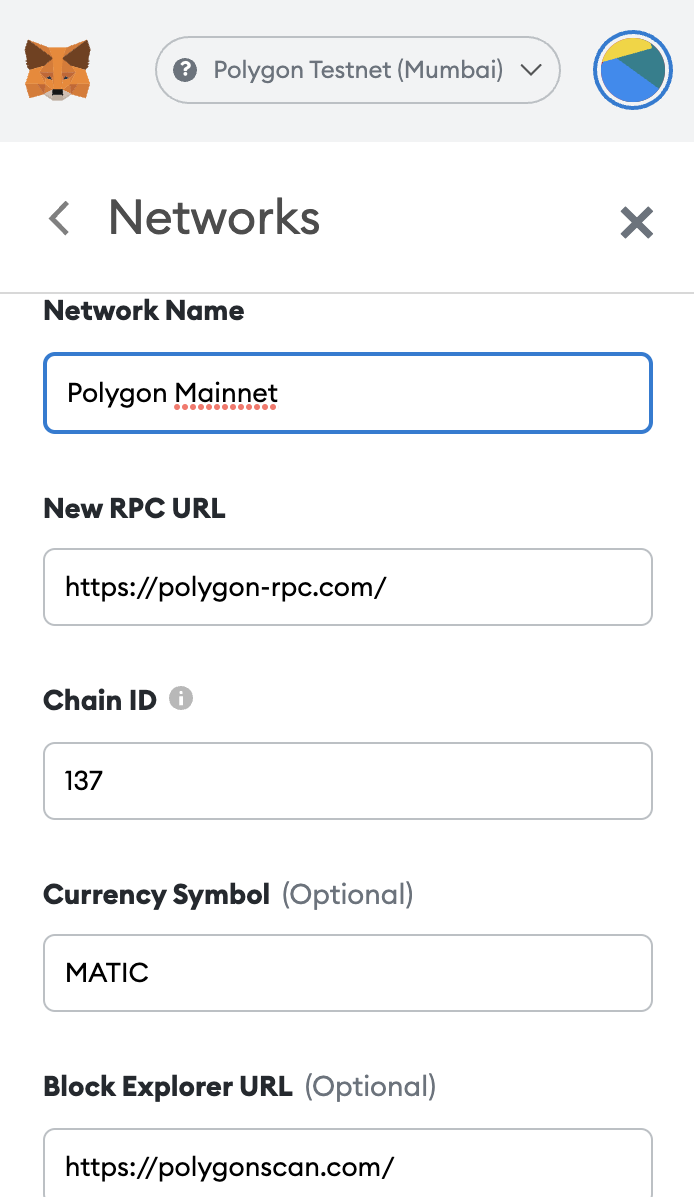
Top Up your MetaMask Account With MATIC
The MATIC token used on the Polygon Mainnet costs money and you have to buy it from a crypto exchange and top up your MetaMask account. Here you can find more details about the current price of MATIC and the exchanges where you can buy it from.
HD Wallet Provider
Open Alchemy and create a new application. Give it a name, set the chain to Polygon and the network to Polygon Mainnet. Copy the HTTP url as we did during the deployment on Polygon Test network (Mumbai).
Configure Truffle
In VSCode open truffle-config.js file and replace matic section with the code below.
Replace HTTP_URL with the url we already copied from the new Alchemy application. Save and close.
Final Preparation Before Deployment
Open the main folder of the project and delete folder build. Run the following command in the Terminal.
Deployment
Run the following command in the Terminal.
This command tells Truffle to migrate our ERC-20 token on the Polygon Mainet.
To check if the ERC-20 token has been deployed successfully, open Polygon Mainet scan network. Copy-paste the address of your MetaMask in the search field and press Enter. You should see a list of transactions that have been signed by your account. Click on the one that says “Contract Creation” and you will see your ERC-20 token.
Add ERC-20 Token To Your MetaMask Wallet
Follow the steps we described above when we were deploying our ERC-20 token on Polygon Test Network (Mumbai).
Deployment on the Ethereum Testnet
I presume you read the previous chapters. To migrate/deploy ERC-20 token on the Ethereum Testnet blockchain network you have to:
- MetaMask. Open your MetaMask and from the top menu switch the network to Ropsten Test Network.
- Top Up Your MetaMask Account With ETH. Use the ETH faucet to top up your Ropsten wallet with test ether. Copy paste your MetaMask address in the field “Ethereum Address” and press “Get ETH”. The process takes a few minutes. Note: The test ETH is only for test purposes. Do not try to transfer it to the main Ethereum network – it won’t work.
- HD Wallet Provider. Open Alchemy dashboard and create a new application. Give it a name, set up the chain to Ethereum and the network to Ropsten. Copy the HTTP url.
- Truffle configuration. In VSCode open truffle-config.js file and inside section networks add the following code.
Replace HTTP_URL with the url we already copied from the new Alchemy application. Save and close.
- Preparation Before Deployment. Open the main folder of the project and delete folder build. Run the following command in the Terminal.
- Deployment. Run the following command.
To check if the ERC-20 token has been deployed successfully, open Ropsten Ethereum scan network. Copy-paste the address of your MetaMask in the search field and press Enter. You should see a list of transactions that have been signed by your account. Click on the one that says “Contract Creation” and you will see your ERC-20 token.
Deployment on the Ethereum Mainnet
I presume you read the previous chapters. To migrate/deploy ERC-20 token on the Ethereum Mainnet network you have to:
- MetaMask. Open your MetaMask and from the top menu switch the network to Ethereum Mainnet.
- Top Up Your MetaMask Account With ETH. ETH costs money and you have to buy it from a crypto exchange and top up your MetaMask account. Note: As of the date of writing this tutorial – 30th of January, 2022 – the fees of signing a transaction on the Ethereum Mainnet are very high. That will change after the release of ETH 2.0. You’ve to consider that fact because that means that you have to top up your account with sufficient amount of ether to be able to deploy.
- HD Wallet Provider. Open Alchemy dashboard and create a new application. Give it a name, set up the chain to Ethereum and the network to Mainnet. Copy the HTTP url.
- Truffle configuration. In VSCode open truffle-config.js file and inside section networks add the following code.
Replace HTTP_URL with the url we already copied from the new Alchemy application. Save and close.
- Preparation Before Deployment. Open the main folder of the project and delete folder build. Run the following command in the Terminal.
- Deployment. Run the following command.
To check if the ERC-20 token has been deployed successfully, open Ethereum Mainnet scan network. Copy-paste the address of your MetaMask in the search field and press Enter. You should see a list of transactions that have been signed by your account. Click on the one that says “Contract Creation” and you will see your ERC-20 token. Congratulations!
How to transfer ERC-20 token from Polygon Mainnet to Ethereum Mainnet?
If you deploy ERC-20 token on Polygon Mainnet you may want to transfer it to Ethereum Mainnet. The process is fairly simple. Open Polygon Bridge and sign in with your MetaMask – your MetaMask account must be topped up with your tokens.
Click on “Polygon Bridge”. The rest is self-explanatory.
Bonus Chapter: How to list my ERC-20 token on UniSwap?
Listing your ERC-20 token on UniSwap is simple.
- Open UniSwap.
- Connect your MetaMask wallet.
- Click “Pool” from the main menu and then choose More -> V2 Liquidity -> Add V2 Liquidity.
- Click “Select a token”, paste your contracts address and select it from the dropdown menu.
- Press “Add” under your token’s name.
- Now you can choose your token.
- Please remember that the first Liquidity Pool creation will form your initial token price. For example, if you input 1 ETH and 1 of your tokens, that means that 1 token = 1 ETH initially. Then the market will form a fair price.
- Choose how many of your ERC-20 tokens and ETH you want to deposit in the pool.
- Press “Approve” and sign the transaction via MetaMask. Congratulations, your ERC-20 token has been listed!
There are other exchanges out there but you have to take into account that most of them have requirements for listing new tokens (e.g., to provide a website, a white paper, etc.).
Also, adding an icon to your ERC-20 token depends on the exchange where you list it. Each exchange and platform has different procedures. But a solution you may consider is adding your token to TrustWallet.
The easy way
I have another news for you. If you want to deploy ERC-20 token with no coding and deep understanding of how the token works, everything we spoke about until now is of no use. There are plenty of tools our there allowing deployment of ERC-20 tokens without coding skills. One of them is Cointool (Note: I want to clarify, I don’t get money for mentioning this tool. The only reason I do it is to give you an example of a tool for creating ERC-20 tokens, NFTs, etc.).
Final thoughts
I know that there are people out there who’d benefit of knowing how to deploy ERC-20 tokens to create scam projects. My opinion is that selling dreams of the next “big thing” and stealing people’s money is not good at all. I hope you read this tutorial because knowledge is your passion and because you’re working on something valuable.
In this tutorial we only scratched the surface of the smart contracts. For instance, ERC-20 tokens can serve different purposes – pausing token transfers, voting, wrapping, etc. I’d recommend checking OpenZeppelin ERC-20 token page.
Thank you for stopping by and I hope I will have time to give more value with fresh content about dApps and smart contracts.
Buy me a coffee
Since we talked about ERC-20 tokens and crypto, if you like the content I wrote, you are welcome giving a tip on the following Ethereium address – 0xe91E59973D74537437564391E718a394d0152F6F
If you need assistance with your ERC-20 token or a question, contact me.
